Condatinuing On From Last Time…
In the first post of this two-part mini-series, we covered how to install Conda using the Miniconda installer, how to keep Conda up to date, and how to set Conda channel configuration. This post will focus on how to work with Conda, including the basics of how to create and manage dedicated virtual computing environments and how to install within them the packages required for specific data analysis tasks.
 Still confused about Conda? Keep reading…
Working with Conda Environments
The central purpose of Conda is to make computing workflows highly reproducible by facilitating configuration and management of isolated computing environments. Environmental compartmentalisation enables potentially incompatible software packages and their dependencies to coexist on a system, ensuring that they are available to work on specific projects or tasks. These might range from rudimentary flexible software version management (e.g. having multiple versions of Python available on one system), to very specific jobs like single-cell RNA-Seq analysis using R v4.2.0 and the requisite contemporary libraries. The diagram below explains these concepts nicely:
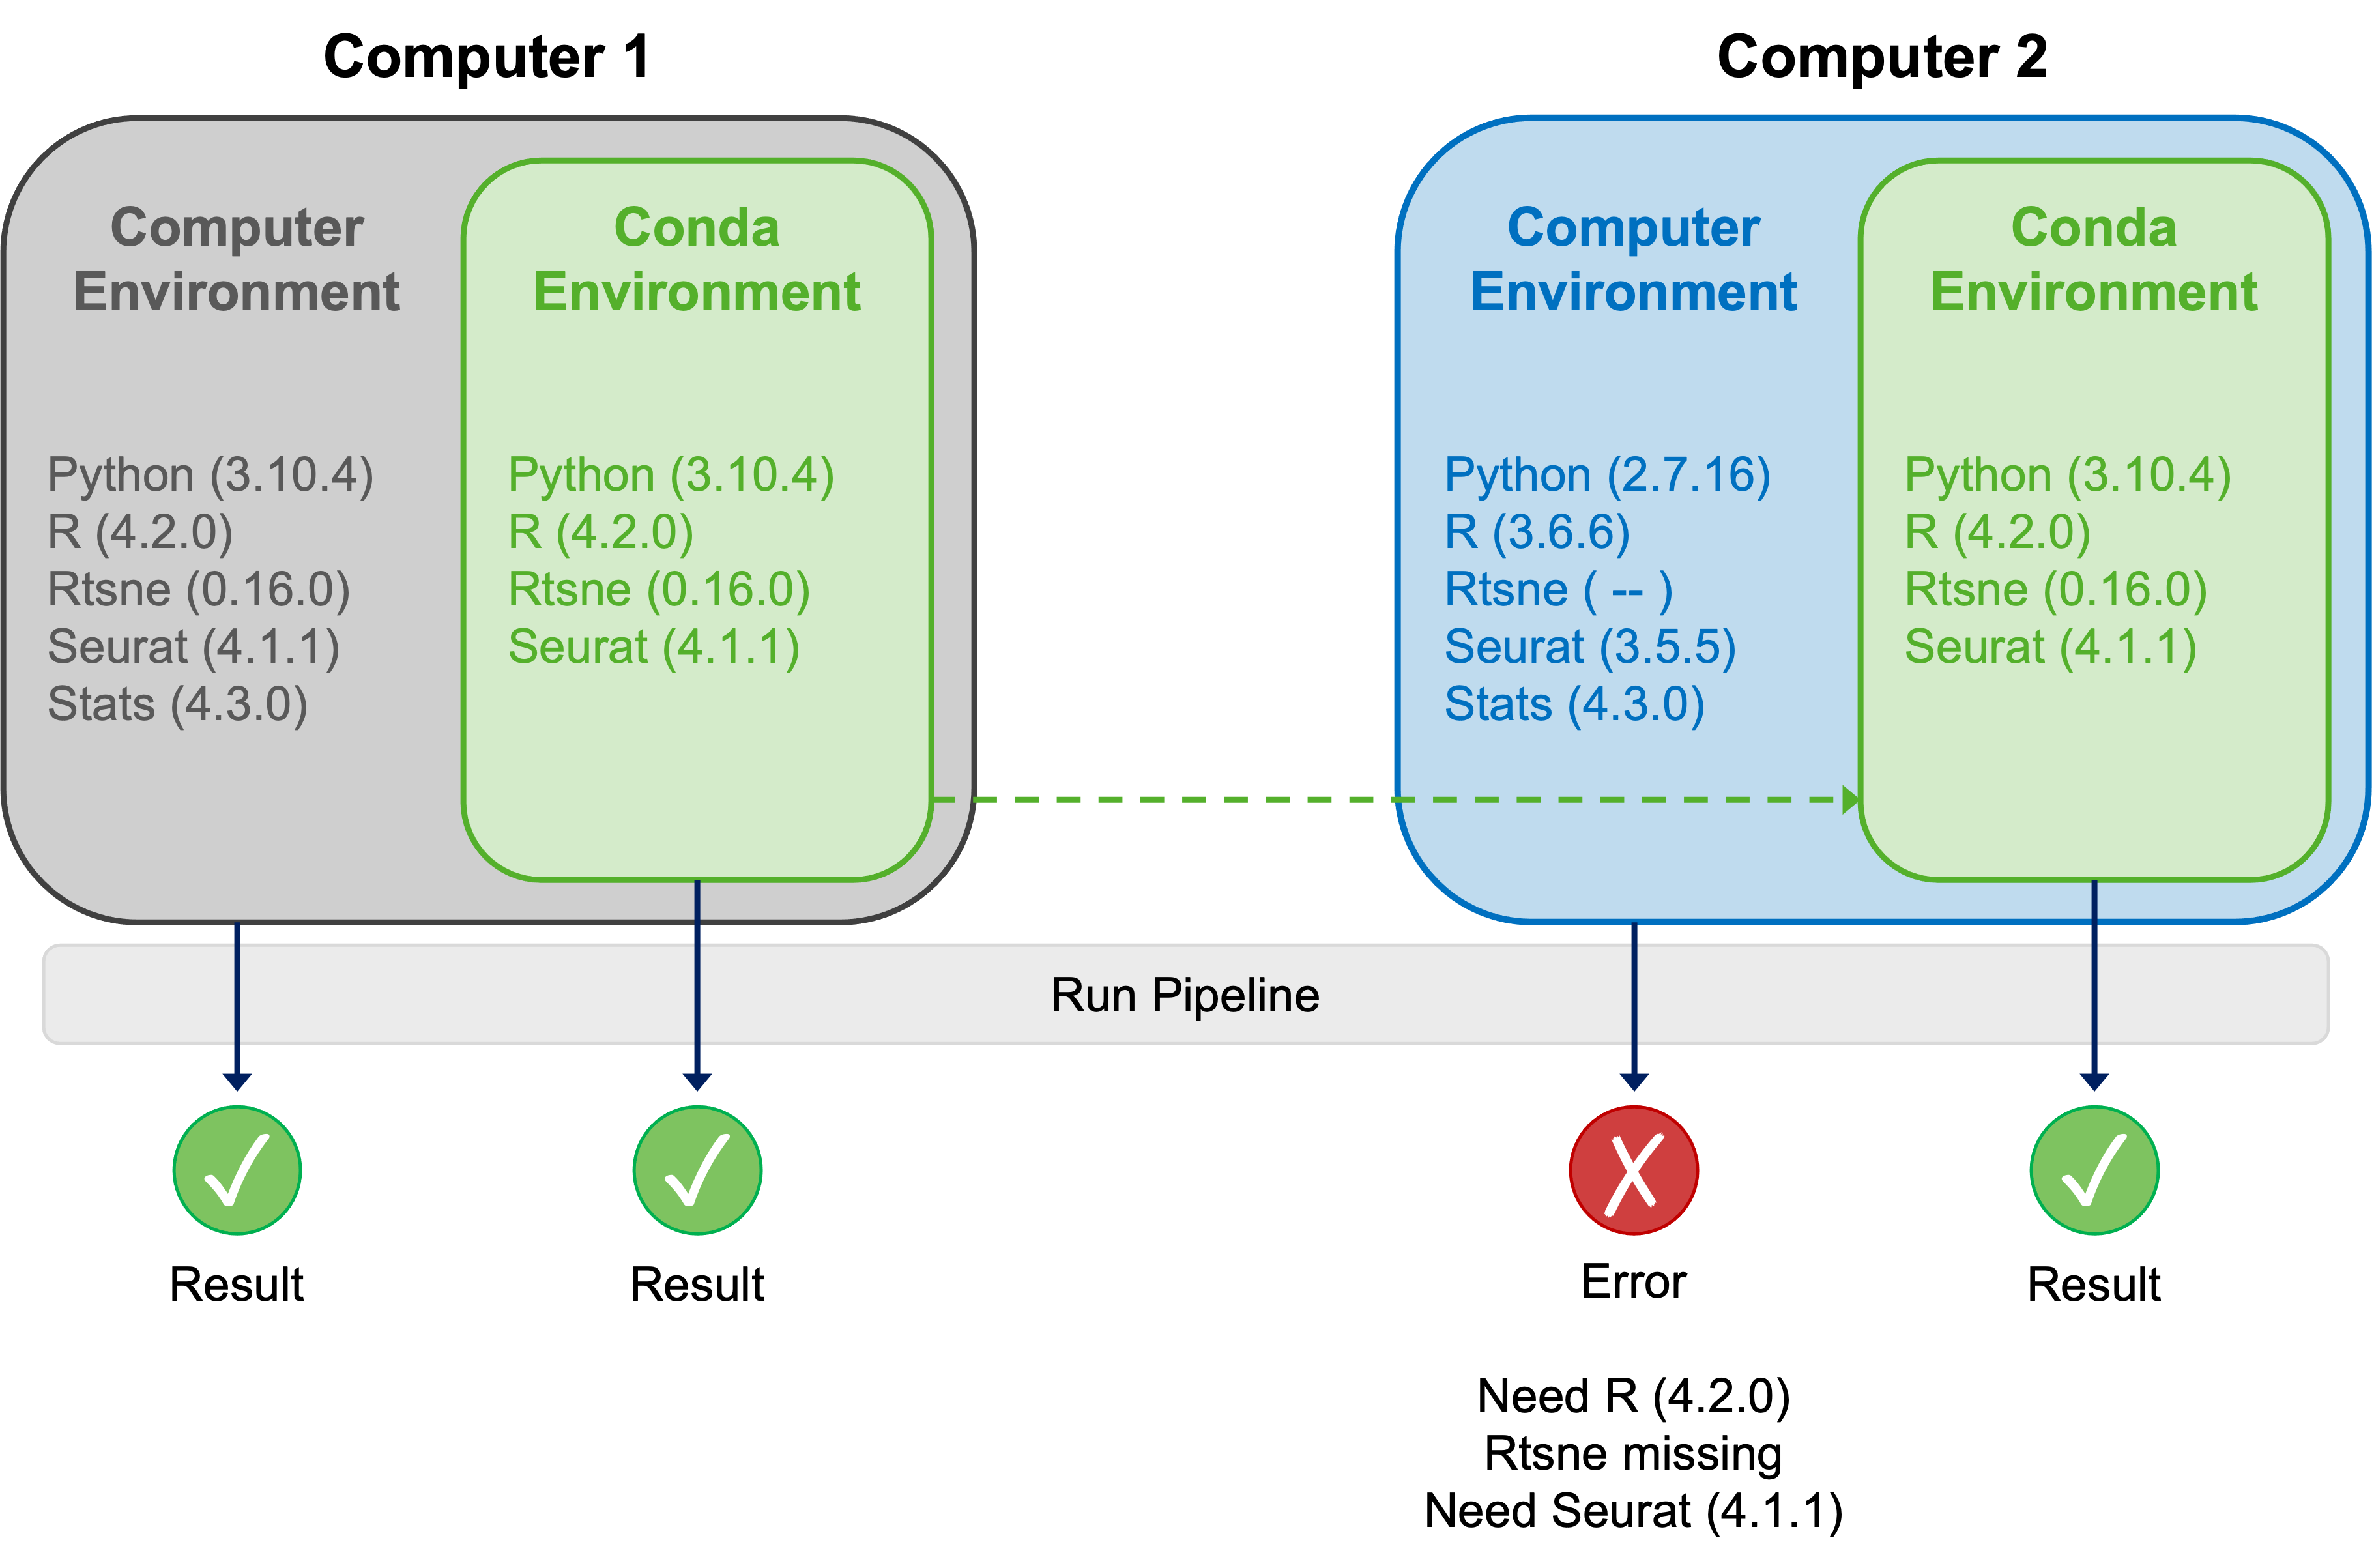
During the installation process, Conda creates a default environment called “base”. Leave the base environment alone! Instead, create specific environments that are oriented towards performing particular computational tasks. Within each of these dedicated environments you can install the software and dependencies required to undertake the respective task.
Let’s create an environment to demonstrate how to begin working with Conda. The general syntax for creating a Conda environment is shown below:
# create conda environment 'new_env' and install 'package_name'
conda create --name new_env package_name
Adapting this command, we can create our environment named “demo_env” and within it we will install the latest version of the BioPython package at creation. To do this run conda create --name demo_env biopython.
After executing the above command, Conda will show you where the environment will be created, the detailed package management plan i.e. what will be installed and from where, and will prompt you to proceed. Type “y” and allow the environment creation to complete.
It is possible to specify multiple packages to install during environment creation, just seperate them with a single space. Alternatively, you can create completely empty enviroments by failing to specify any packages; these can be populated by installing new packages and dependencies later using the same steps described below.
To view the Conda environments that you have created you can run either of the following:
# view conda environments
conda info --envs

# view conda environments
conda env list
Entering either of these commands into the Terminal at this point should result in an output similar to the one shown below:
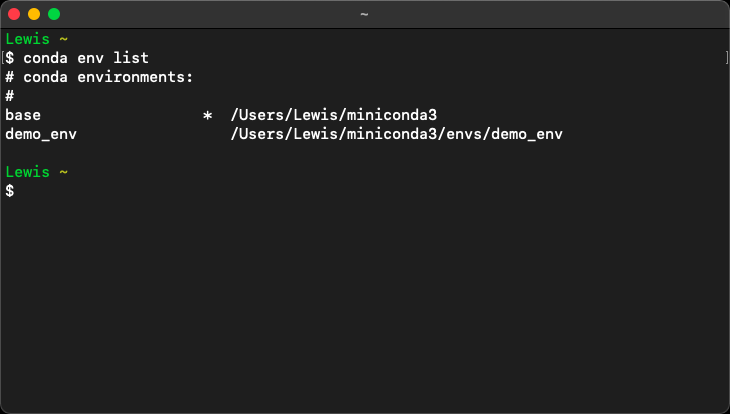
The asterisk (*) usually denotes the active environment. However, when no environment is active, the asterisk returns to the base environment.
Now let’s look at how to work with Conda environments. First, let’s activate an environment; the generic command syntax for this is shown below:
# activate the conda environment 'environment_name'
conda activate environment_name
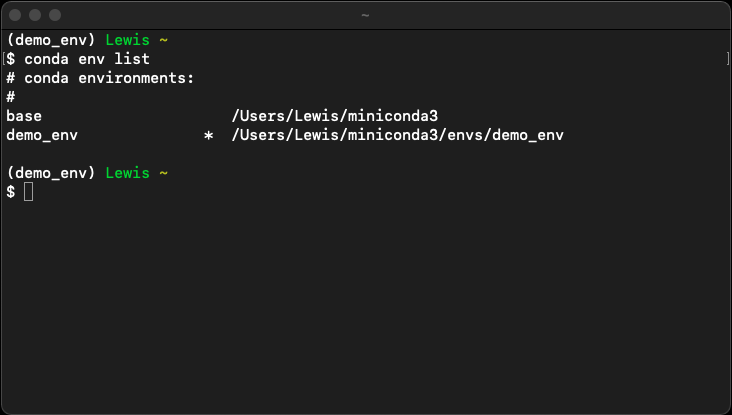
We can use this command to activate the environment we created earlier. To do so run conda activate demo_env. Activating an environment in this manner will be confirmed by the environment name being prepended to your prompt. The asterisk (*) also moves to indicate the active environment when you run the conda env list command. Running both commands at this point should result in a Terminal output like the one shown below:
Running conda deactivate will deactivate the active environment.
To switch between multiple environments, you can use a combination of the conda activate and conda deactivate commands, ensuring that you specify an environment name as an argument to the former.
One thing to note is that activating sequential environments to switch between them will result in a series of previously active environments; this is not a problem, just remember that you will have to conda deactivate back down the series of environments should you wish to completely deactivate Conda.
An oft-touted “trick” is to run conda activate with no further arguments to return to the base environment. This doesn’t avoid the latter requirement of having to run conda deactivate several times to completely deactivate Conda and might also result in accidental modification of the base environment. Don’t use it.
Pretty straight forward so far. Thankfully it doesn’t get much more complex for most standard use-cases. Let’s move on to look at Conda packages.
Packages in Conda
One of the most powerful aspects of Conda is the automatic handling of platform specification and package dependencies. When you install a package, Conda chooses the appropriate package for the platform you are using (which may contain platform- or operating system-specific binary artifacts), identifies any other packages that are required for it to run, downloads all these files and installs them seamlessly. A Conda package can therefore be thought of as a bundle of resources containing all the files required to allow a given program to execute correctly on a particular system.
While Conda packages are most widely used with Python, nothing about them or the tool itself assumes any specific programming language; Conda packages can be used for bundling libraries in other languages (e.g. in R) or for distributing binary executables generated from virtually any programming language.
In order to list all packages installed in an environment you can use the commands shown below:
# list all packages installed in the active environment
conda list

# list all packages installed in 'environment_name'
conda list --name environment_name
Running conda list in the active demo_env environment will display the packages that were installed alongside BioPython when we created the environment.
Now let’s install a new package into our active environment; the generic command syntax for basic package installation is shown below:
# install latest version of 'package_name' into active environment
conda install package_name

# install latest version of 'package_name' into 'environment_name'
conda install --name environment_name package_name
We might use this command to install a package such as the pandas data analysis and manipulation library for Python by running conda install pandas.
Most Conda packages use a system called semantic versioning to identify distinct versions of software packages unambiguously. Under semantic versioning, software is labelled with a three-part identifier consisting of a major revision, minor revision and patch number separated by a “.” symbol. This system assumes that all software starts at version 0.0.0.
It is possible to install a specific version of a package into the active environment by specifying the version in the command:
# install specific major version of 'package_name'
conda install package_name=1

# install specific major and minor version of 'package_name'
conda install package_name=1.2

# install specific major, minor and patch version of 'package_name'
conda install package_name=1.4.1
It is similarly possible to use semantic versioning to specify the version of a package to install during environment creation or into an environment other than the active environment by adapting commands we have already encountered:
# create and install version 1.4.1 of 'package_name'
conda create --name environment_name package_name=1.4.1

# install version 1.4.1 of 'package_name' into 'environment_name'
conda install --name environment_name package_name=1.4.1
Conda has an in-built function that enables users to search for a specific package that you want to use for a particular task. The generic command syntax for this is shown below:
# search for a package called 'package_name'
conda search package_name
The resultant output shows all versions of the query package and the channel or channels where each version is available.
Let’s say we were interested in a legacy version (e.g. 0.9.0) of a particular package. As you may have guessed, it is also possible to use semantic versioning in Conda searches, so we could have searched specifically for that version by adapting the command shown above to become either of the following:
# search for exactly version 0.9.0 of 'package_name'
conda search package_name=0.9.0

# search for exactly version 0.9.0 of 'package_name'
conda search package_name==0.9
The difference here is that the first search is “fuzzy”, and the scope controlled by specifying the exact patch, while the second command omits the patch number but uses an “exactly equal” operator, so must match the earliest patch for the minor version given. Both will match only version 0.9.0 but for different reasons. If we had used only one “=” in the latter command, the search would have become “fuzzy” and returned 0.9.0, 0.9.1, 0.9.2 etc.
We can also use relational and logical operators when searching. Note the use of “,” as the AND operator instead of the more usual “&”, as well as the use of the single quotes ‘ ‘ in searches where operators are used:
# search for 'package_name' versions later than and including 0.8.0
conda search 'package_name>=0.8.0'

# search for 'package_name' versions earlier than and including 0.10.0
conda search 'package_name<=0.10.0'

# search for 'package_name' versions between 0.8.0 AND 0.10.0
conda search 'package_name>0.8.0,<0.10.0'

# search for 'package_name' versions equal to either 0.9.0 OR 0.9.1
conda search 'package_name=0.9.0|0.9.1'
The final thing that I want to cover related to searching and installing packages in Conda is the possibility of using a specific channel while overriding those configured in the settings. To do this we have to use the --override-channels and --channel flags to ensure that the channels defined in the settings are temporarily overridden by those defined in the command. The command syntax for this is shown below:
# search for 'package_name' in the specific channel 'channel_name'
conda search --override-channels --channel channel_name package_name

# install 'package_name' from the specific channel 'channel_name'
conda install --override-channels --channel channel_name package_name
Note that all of the constructs described above (e.g. semantic versioning, operators and fuzzy searching) can also be used here and if multiple search channel are required, each channel name must be separated by a single space.
Now let’s quickly look at how to update packages.
Imagine that having run a search, we had installed legacy version 0.9.0 of the seaborn statistical data visualisation library for Python into our active demo_env environment by running conda install seaborn=0.9.0. Now imagine that we then decide we no longer want to use this legacy version of the package and need to update it to the latest version; we could do this using the following command:
# update the package 'package_name' installed in active environment
conda update package_name

# update the package 'package_name' installed in 'environment_name'
conda update --name environment_name package_name
Alternatively, we could have opted to simply update all packages in the environment by using the commands shown below:
# update all packages in the active environment
conda update --all

# update all packages in 'environment_name'
conda update --all --name environment_name
Just before moving away from the topic of versioning, it is worth noting that when you create a Conda environment and install Python without specifying a version number or install a package where Python is a dependency for the first time, Conda will automatically use the same Python version that was in use when you downloaded and installed Conda. In order to use a different version of Python, simply specify the version of Python that you want when you create the environment.
Reusing and Transferring Environments
Imagine you wanted to create multiple specific environments for undertaking tasks that all shared several common packages. Rather than building each of these environments separately, you could build a single environment containing all shared packages to serve as a common progenitor, clone it, and then develop each copy further to produce the dedicated environments required.
To make an exact copy of an environment the command syntax is as shown below:
# clone 'env_to_clone' and name the resultant copy 'env_copy'
conda create --clone env_to_clone --name env_copy
 “Well…what about importing and exporting in Conda?”
It is possible to transfer (import and export) Conda environments using YAML files. The file name “environment.yml” is often used by convention but any file name can be used. Text documents (.txt) can also be used to transfer Conda environments but using the YAML file type and .yml extension is strongly encouraged.
To export an environment specification into your current working directory or create an environment from a shared specification located in your current working directory, use the following commands:
# export the environment 'environment_name' to a .yml named 'file_name'
conda env export --name environment_name --file file_name.yml

# import the environment specified in the .yml 'file_name' as 'environment_name'
conda env create --name environment_name --file file_name.yml
These functions enable environment portability and mean you can create permanent records or backups of your environment specifications. You could also use version control with these documents. Conda does have a built-in rudimentary version control system that can be use to quickly restore an environment to a particular revision. Learn more about it and other more advanced environment management commands here.
Stay Clean Kids
You might have noticed that you have not yet encountered any way to uninstall packages or delete the environments you create in Conda. The very last thing that we are going to cover in this post is cleaning up.
The commands required to uninstall a package from your active or a named environment, along with the command required to completely remove an environment and all the packages contained within it, are shown below:
# remove 'package_name' from the active environment
conda remove package_name

# remove 'package_name' from the environment 'environment_name'
conda remove --name environment_name package_name

# completely remove the environment 'environment_name'
conda env remove --name environment_name
Feel free to try these commands out in sequence using the demo_env environment we created now that it has served its purpose.
Lastly, Conda has a built-in function for removing residual unused files such as cached package archives and logs. The workhorse command to get rid of all these unused files is:
# remove all unused files
conda clean --all
If you run this command as is, you will be prompted once each when Conda asks permission to delete unused tarballs, index caches, packages, tempfiles and logfiles; you can append the -y flag to the above command so Conda does not ask for these confirmations.
Condasulting Other Resources
While we have covered many of the most common commands you will need, there are other functions and ways to adapt Conda commands that we have not covered. Here are the four key resources I would initially suggest consulting for more information to guide you as you learn to use Conda:
1) Command line help:
# read the help file for 'command_name'
conda command_name --help
2) Conda docs
3) Conda cheat sheet
4) Conda command reference
Condaclusion
In this post we have covered many aspects of working with Conda; you should now be equipped with the skills to find and install the specific tools you require into dedicated analysis environments that you can manage and transfer to deliver reproducible scientific computational workflows.
Hopefully this mini-series has convinced you of the utility of Conda for data science and bioinformatics and demonstrated how easy it is to use.
In future, I will cover specific use cases of Conda, such as building and managing Python and R development environments and using these alongside applications such as Visual Studio Code and R Studio. I also have related series planned on the topic of containerisation tools like Docker and Singularity, which are becoming increasingly more widespread in data science and bioinformatics, particularly for building reproducible workflow environments in the high-performance computing setting.
See you next time.
Thanks for reading. I hope you enjoyed the article and that it helps you to get a job done more quickly or inspires you to further your data science journey. Please do let me know if there’s anything you want me to cover in future posts.
Happy Data Analysis!
Disclaimer: All views expressed on this site are exclusively my own and do not represent the opinions of any entity whatsoever with which I have been, am now or will be affiliated.