Git
/ɡɪt/
noun DEROGATORY • INFORMAL
an unpleasant or contemptible person
“that old git”
Low hanging fruit? Perhaps. However, it was with reference to the term of insult and with tongue-in-cheek self-derision that Linus Torvalds (self-proclaimed “egotistical bastard” [1] and inventor of Linux) named his version control system. And like Linux, Git is an absolute corker.
Version control is one of the power tools of programming and incredibly popular amongst data scientists. A version control system is a tool that allows you to manage and track changes to the directories and files in a project, see when changes were made, undo any changes you decide you don’t want, and collaborate at scale. Every data scientist or developer should learn basic version control.
 Version Control for Northerners
Many version control systems exist. Some use a graphical user interface (GUI) and some use a command line interface (CLI). I use Git at the command line so that’s what I’m teaching. Fear not. Using the command line for rudimentary operations is easy and I will explain any shell commands used outside of the basic commands for Git.
Basic Git Workflow
The most basic Git workflow would likely involve initialising a project repository, adding files or creating files within that repository, instructing the repository to track the changes to those files, working on those files while intermittently updating and saving, and finally backing changes up locally and remotely at a particular milestone, allowing them to later be reset or pulled from storage as required.
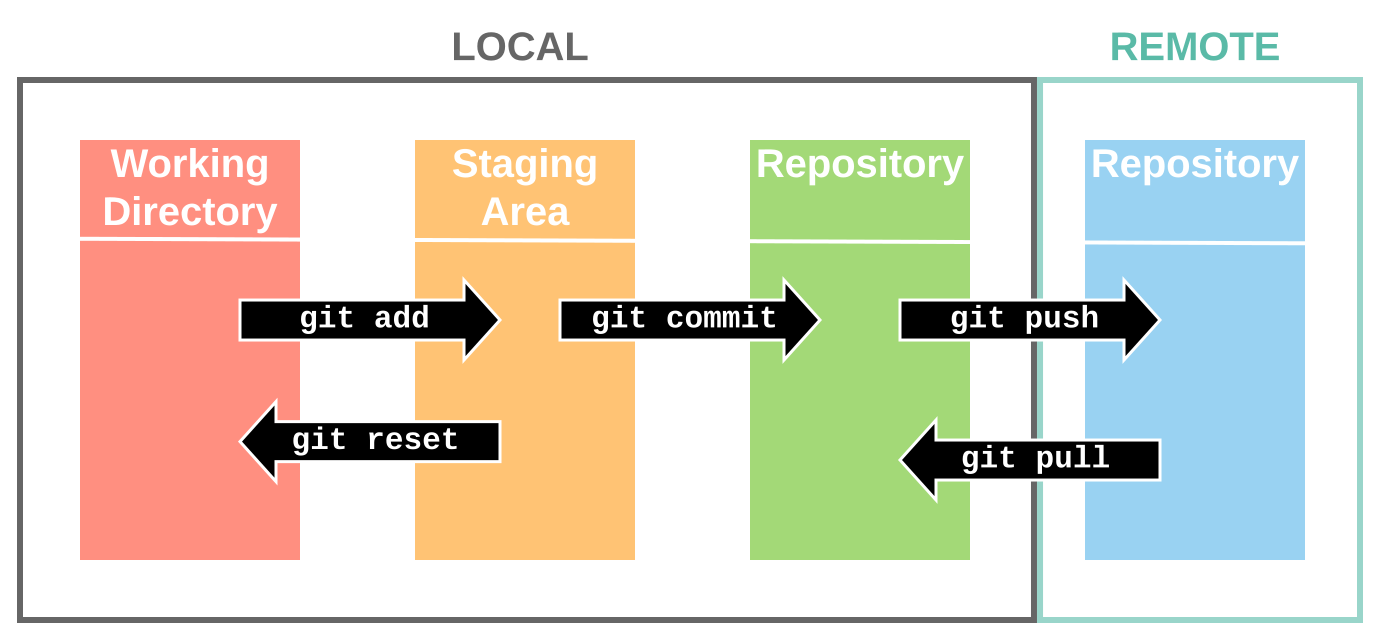 Basic Git Workflow
Source: support.nesi.org.nz
For example, you could be working on a website to host your blog and realise that you need to change the base font to a sans serif font. However, as you’re still learning CSS (cascading style sheets - used to format HTML documents like web pages), you’re not sure exactly where to apply changes in order to preserve rendering of your post dates in a fancy serif font while changing everything else. Nightmare.
With Git, you can create an identical copy of your files, play around with the components and then when you are satisfied with your changes, you can merge your copies into the original files without any risk of messing up what you already had in place. Sorted.
Installing and Configuring Git
If your computer is a Mac or Linux machine, the chances are Git is already installed. If you have a Windows machine, get a Mac. Seriously though, if you need to install Git on your computer you can download the latest version from the official website and follow their installation instructions.
To check whether Git is installed run git --version at the command line.
The next thing to do is some basic setup. Here we are going to set the username and email address for all projects for a single user on a system, just swap “your_name” and “email_address” with your personal details.
We’re also going to make a small quality of life change and swap the default text editor from vim to the much more novice-friendly nano. More on vim and nano in a future post about script editors and integrated development environments (IDEs).
# set username
git config --global user.name your_name

# set user email address
git config --global user.email email_address

# set the default text editor to nano
git config --global core.editor "nano"
To configure these settings for either a single project repository or for all users on a machine simply swap the --global flag to either --local or
--system. In order to view your config at any time use git config --list.
That’s our very basic setup complete. Ready to start a project.
Initialising a Project Repository
Let’s imagine we want to move from our home directory (e.g. /Users/Lewis) and create a project folder on the Desktop. We could navigate to the Desktop and then simultaneously create the root directory of our project and initialise it as a git repository like this:
# change directory from home dir to desktop
cd Desktop/

# initialise a git repository for a project called "git_tutorial"
git init git_tutorial
If you had already made a directory somewhere else on your file system and wanted to use that as project repository, navigate to the directory at the top level of that project and then initialise a Git repository. For example, if you had a load of files and folders in the directory old_project inside your Documents folder:
# change directory from home dir to pre-existing project directory
cd Documents/old_project

# initialise the "old_project" directory as a git repository
git init
Git project repositories have two main components: the directories and files that you create and edit, and the data that Git records about the project’s history. Git stores this information in a hidden directory .git located in the root directory of the repository. Leave your .git directories alone!
Tracking Files and Staging Changes
Git has a staging area in which it stores files with changes you want to save. Putting files in the staging area is like putting them into an email, while committing those changes is like sending the email: you can add things, remove things and otherwise modify your email as often as you want, but once you hit “send”, you can’t make further changes and there’s a permanent record of your email in your outbox. You can always edit the email you sent and then resend it but the record and content of the first one you sent isn’t altered.
A file in a Git repository has one of the following statuses:
-
Untracked: a file that is newly created or added to the local repository and is not yet being tracked by Git.
-
Modified: a file that has unsaved changes i.e. it has been altered since it was last staged and committed.
-
Staged: a staged file has no unsaved changes but the save is not permanent and can be over-written multiple times; there is no permanent record of the changes made in the history log of the local repository. It can be seen as a temporary or working save.
-
Committed: a file in the committed state has no unsaved changes and the saved changes are permanently recorded in the history log of the local repository. Files in the committed stage are files ready to be pushed to a remote repository for backup. More on this in a future post.
To check the status of a repository and display a list of the files that have been modified or staged since the last time changes were saved use the git status command.
Let’s imagine that in the git_tutorial repository created earlier I had added a file called example_file.txt. Running git status in my current working directory now displays the following:
On branch master

No commits yet

Untracked files:
  (use "git add <file>..." to include in what will be committed)
    example_file.txt

nothing added to commit but untracked files present (use "git add" to track)
If we had initialised an existing directory as a Git repository, as in the old_project example above, any files in that directory would show as untracked.
In order to begin tracking changes to a specific newly added or created file, or to stage changes to those already being tracked, we can use the git add command followed by the file name. For example, I am going to start tracking changes to example_file.txt by running git add example_file.txt.
Rechecking the repository status now using git status results in the following output:
On branch master

No commits yet

Changes to be committed:
  (use "git rm --cached <file>..." to unstage)
    new file:   example_file.txt
Clearly it would soon become impractical to add files one by one if we had many files. To add all files within a specific directory and its subdirectories we can use the git add command followed by the directory name. In order to add all files within a repository and all of the subdirectories contained within we can use git add --all.
Now we can keep working on our files, intermittently staging changes as we go, and then when finished, make the changes permanent by committing them.
Committing Changes
To permanently save the changes to files in the staging area, you use the
git commit command, which always saves everything in the staging area as one package.
When you commit changes, Git requires you to enter a log message. This serves the same purpose as a comment in a code chunk; it gives other people or your future self a quick summary of what changes you made and why. Git does have a number of functions for examining repository history and changes to files in detail but that will be the focus of a future post.
You can write yourself a short message when you make a commit by using
the -m flag like this: git commit -m "short message". For example, if I wanted to quickly commit the staged changes to my example_file.txt document inside the git_tutorial repository I would run the following command:
git commit -m "added example_file.txt".
If the commit message is erroneous, you can easily correct it by running
git commit --amend -m "new message".
Writing short, one-line log messages like this is fine for small changes but if you want to record more information, particularly when collaborating, you can run git commit without the -m flag, which results in Git launching the nano text editor to let you write a log message. The default template looks like this:
# Please enter the commit message for your changes. Lines starting
# with '#' will be ignored, and an empty message aborts the commit.
#
# On branch master
#
# Initial commit
#
# Changes to be committed:
#       new file:   example_file.txt
#
The lines starting with # are comments, and won’t be saved; they’re there to remind you what to do. Helpful. Your message should go above the comment lines and can be as long and detailed as you like. However, if you start writing a Dickensian tome each time you make a commit your collaborators will likely be inclined to hit you with one!
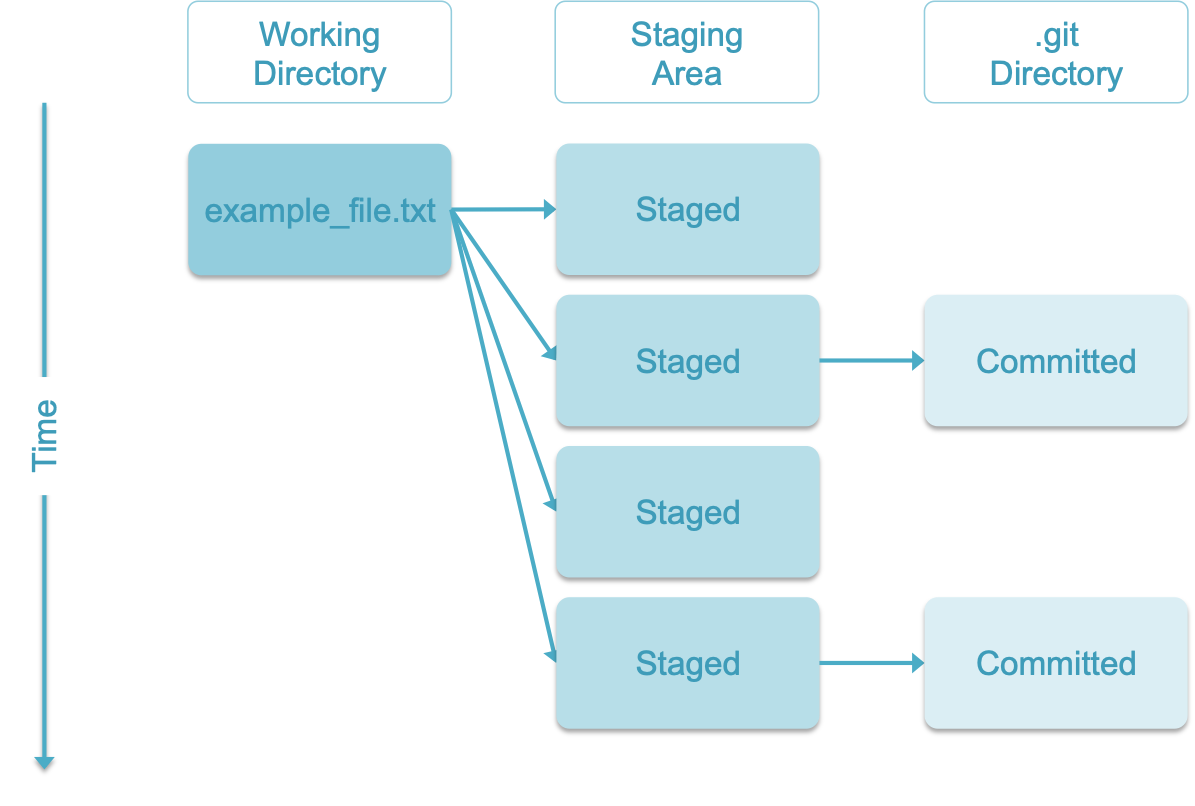 Staging and Committing Files in Git
Armed with the information you have just read you can now implement version control to save and track changes to your data science projects. So don’t be a daft git and start using Git!
Future posts in this series will cover how to view changes made to files and repositories over time, controlling repository behaviour, branching and merging projects, undoing changes, and how to work with remote repositories and collaborate at scale.
Thanks for reading. I hope you enjoyed the article and that it helps you to get a job done more quickly or inspires you to further your data science journey. Please do let me know if there’s anything you want me to cover in future posts.
Happy Data Analysis!
Disclaimer: All views expressed on this site are exclusively my own and do not represent the opinions of any entity whatsoever with which I have been, am now or will be affiliated.