git --recap
So far in this series we have covered basic concepts, how to control repository behaviour using .gitignore files, how to view repository history, and the commands required to undo changes and commits. In this penultimate post in the series we are going to cover branches. Buckle up…

Git Branches
A common workflow for folks who don’t use version control is to create duplicate files and name them to indicate different versions (e.g. myfile_v1.txt, myfile_v2.txt) or to use subdirectories to hold projects in different states (e.g. draft_dir, final_dir etc.). Invariably, this approach will result in versions of versions (myfile_v1_edited.txt, myfile_v1_edited_updated.txt), and perhaps versions of versions held in directories to indicate different versions. What a mess!
The main problem with this approach is that it becomes difficult to track whether you have the correct version of each file in each directory and whether you are working on the correct version of each file. Ultimately, this means you risk losing work. Of course, all of this is a non-issue for everyone reading this post because you all use Git now, right? 🤔
One of the main reasons version control tools like Git are so useful and popular is their ability to create branches. Each branch is like a parallel universe; this means you can have multiple independent versions of your work, each version is tracked systematically, and the changes you make to files on one branch do not affect those on other branches until you intentionally merge them back together. More on merging branches later.

Every newly created Git repository has a default branch called “master”. To list all branches for a repository, you can run the command git branch. The branch you are currently in will be shown with a “*” beside its name. For example, running this command in my git_tutorial repository produces the following output:
Lewis ~/git_tutorial
$ git branch
* master
  new_branch
Pro Tip: It is possible to configure Git so that the default branch is named something different instead of “master”. A popular alternative is “main”. We could force this default behaviour by setting it in the Git configuration file using the command git config --global init.defaultBranch main.
Creating and Switching Branches
Creating a branch is as simple as git branch followed by the name of the branch you want to create. For example, I created my branch named “new_branch” shown in the console output above using the command git branch new_branch. A newly created branch is initially an identical snapshot of the branch from which it was created. Once you start making changes, these will only affect the branch you are currently on.
Switching branches can be done using git checkout followed by the branch name. So, if I wanted to switch to the branch named “new_branch”, I would run git checkout new_branch. Running git branch subsequently as a sanity-check would produce the following output:
Lewis ~/git_tutorial
$ git branch
  master
* new_branch
Notice how the “*” is now next to “new_branch”, indicating that I successfully switched from the “master” branch to “new_branch”.
It is possible to simultaneously create a new branch and switch to that new branch using git checkout -b followed by the name of the new branch. For example, if I wanted to create another branch in my git_tutorial repository called “another_branch” and then switch to it in one step, I could use the command git checkout -b another_branch. I love a good one liner.

Note: Git will only let you switch branches or create and switch to the newly created branch if all of the changes on your current branch have been committed or discarded. You can get around this but doing so is outside the scope of what I want to cover in this series of posts on basic Git useage.
Viewing Differences Between Branches
If you read the second post in this series, you might have guessed from the section header that we might be seeing our useful old pal git diff again. To view the differences between files tracked on two different branches we can use the command git diff branch1..branch2.
In this instance, branch1 is the “background” and branch2 is the “test”, so this command shows you what’s added, removed and altered for files on branch2 compared to the state of files in branch1. Pretty easy.
Merging Branches
Just as branching lets you create independent parallel versions of your work, merging is what lets you unify them. When you merge one branch (source) into a second branch (destination), Git incorporates the changes made to the files on the source branch into the files present on the destination branch. The result is a new commit in the destination branch.
In order to merge two branches, we can use the command git merge followed by the name of the source and destination branches. For example, I would run git merge new_branch master to incorporate the changes made to files on “new_branch” into those committed on the “master” branch since the two initially diverged. This would result in the updated diagramatic representation below:
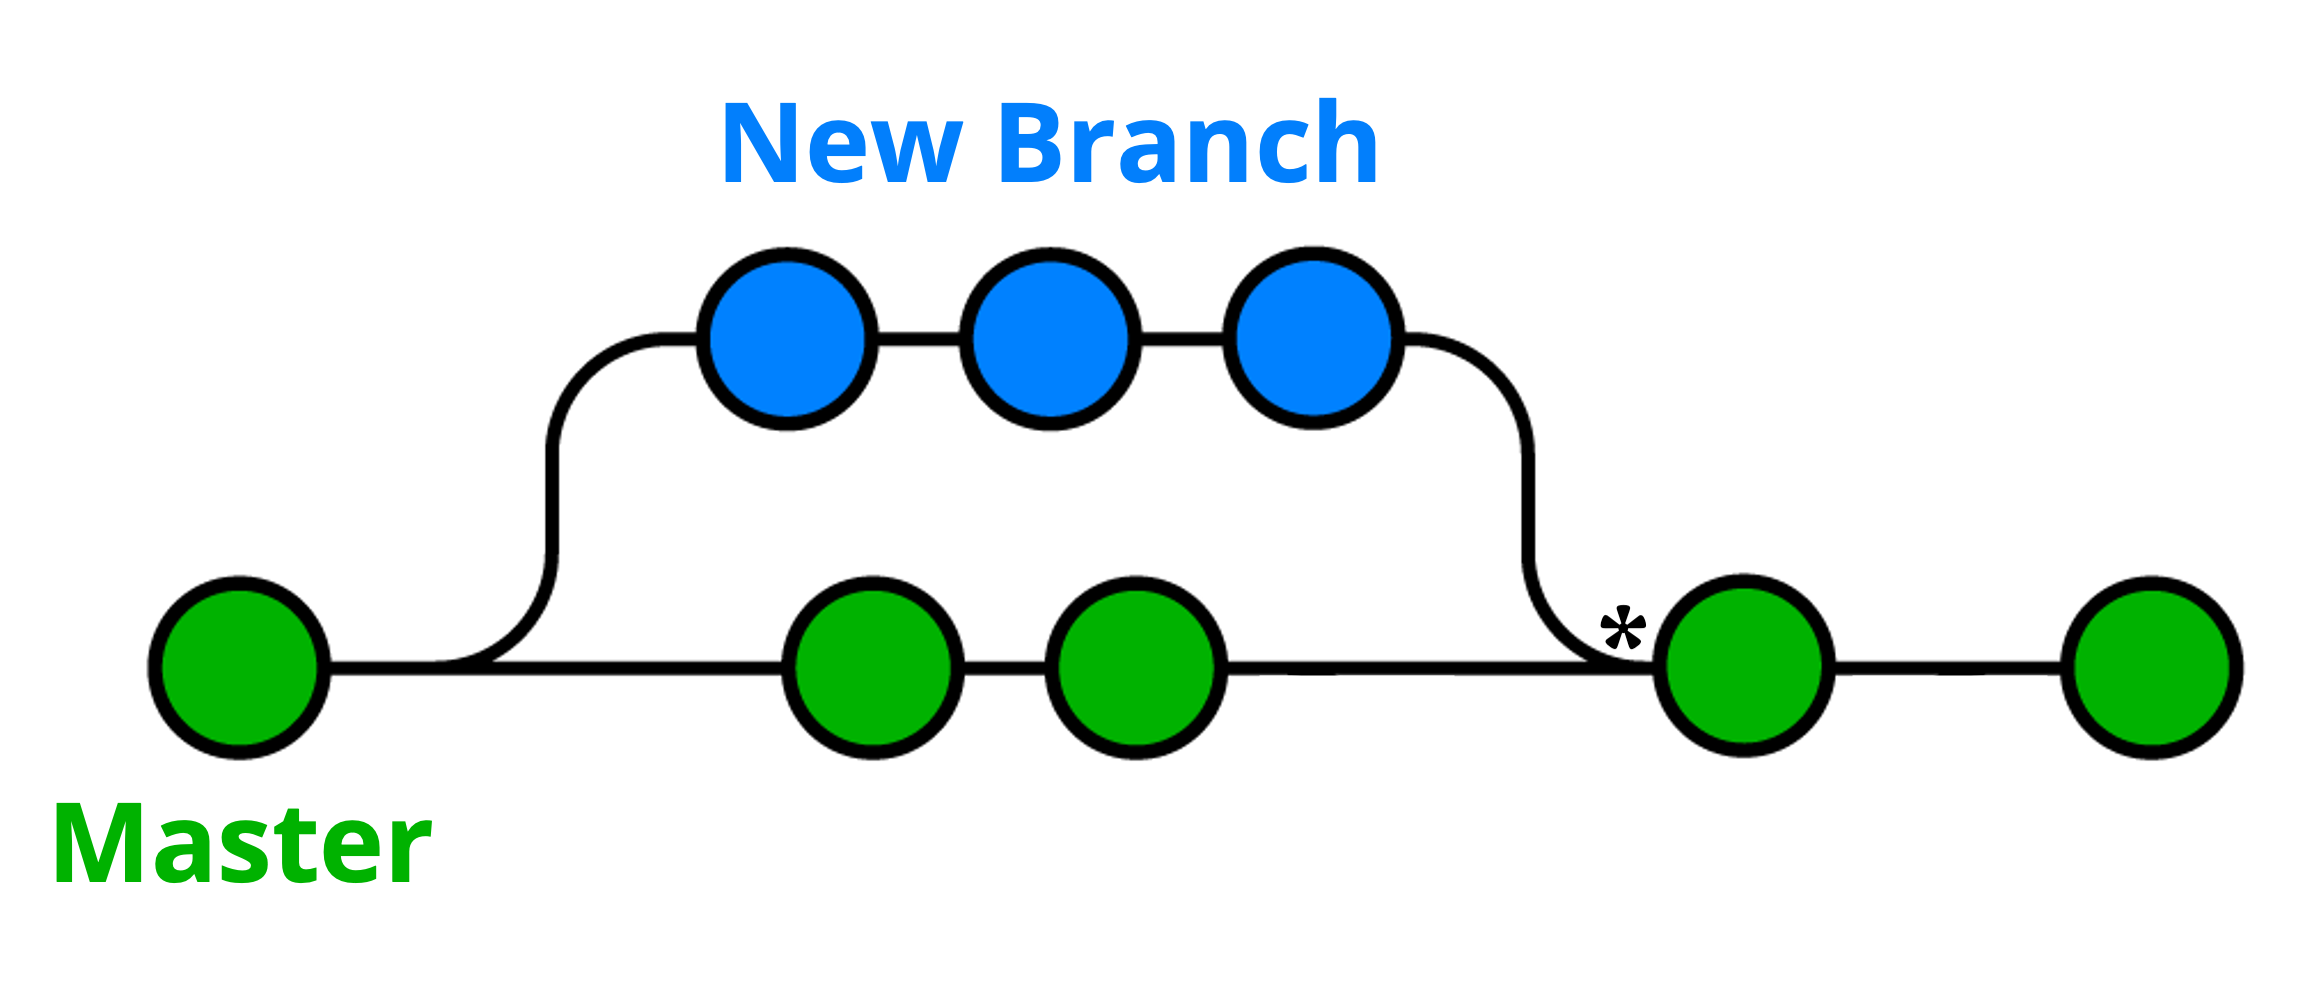
In this example, the merge event indicated by “*” would unify the two branches, incorporating all changes made to files on “new_branch” (source) into those on the “master” branch (destination), assuming that these did not conflict. We will look at conflicts and how to deal with them shortly.
Recall from last time that HEAD is the default commit and always refers to the most recent commit. This means we can also merge other branches into the current working branch using git merge source HEAD, where source would be the branch from which you want to merge changes.
Conflict Resolution
At some point, you will make changes to files on two branches that will conflict with one another. Conflicts occur when attempting to merge branches on which different versions of the same documents contain alternative information in the same place. For example, changes made to a script might affect the same lines of code in two different versions held on parallel branches, or analyses carried out on those branches might result in different records being appended to parallel versions of the same output file; when we attempt to merge these branches, we get a conflict.
Git will automatically indicate when a conflict occurs during a merge and rely on you to reconcile the conflicting changes. Below I have fabricated an example conflict that arises due to a document called “new_file.txt” when attempting to merge “new_branch” into the “master” branch.
Lewis ~/Desktop/git_tutorial
$ git merge new_branch master
Auto-merging new_file.txt
CONFLICT (content): Merge conflict in new_file.txt
Automatic merge failed; fix conflicts and then commit the result.
Running git status subsequently will enable you to remind yourself which files have conflicts that require resolution:
Lewis ~/Desktop/git_tutorial
$ git status
On branch master
You have unmerged paths.
  (fix conflicts and run "git commit")
  (use "git merge --abort" to abort the merge)

Unmerged paths:
  (use "git add <file>..." to mark resolution)
    both modified:   new_file.txt

no changes added to commit (use "git add" and/or "git commit -a")
Git will automatically insert markers into the relevant documents indicating where the conflicts have occurred. Git will also automatically stage this marker insertion as a change. The conflict marker produced within “new_file.txt” during the above conflict is shown below:
<<<<<<< HEAD
conflicting content from destination
a
b
c
=======
conflicting content from source
x
y
z
>>>>>>> new_branch
To resolve this conflict, you would simply open the offending “new_file.txt” file, edit the contents to remove the conflict markers and unwanted changes, and then save the file. Having done this, running git status would result in the following output:
Lewis ~/Desktop/git_tutorial
$ git status
On branch master
All conflicts fixed but you are still merging.
  (use "git commit" to conclude merge)
As instructed by Git, making a commit would then conclude the merge. Checking the git log output at this point, which you will remember shows the commit history, would confirm that the logs for both branches are preserved when a merge is made, with the most recent entry being the commit made during the merge.
git --review
In this post we have covered how to list, create and move between repository branches with git branch and git checkout commands, how to view differences between branches with git diff, how to merge branches with git merge, and how to resolve conflicts without physical violence.
You are now fully equipped with all the skills required to implement basic version control workflows for your projects locally. I have one more post in this series which will cover how to work with remote repositories on GitHub, enabling project portability and collaboration. See you next time.

Thanks for reading. I hope you enjoyed the article and that it helps you to get a job done more quickly or inspires you to further your data science journey. Please do let me know if there’s anything you want me to cover in future posts.
Happy Data Analysis!
Disclaimer: All views expressed on this site are exclusively my own and do not represent the opinions of any entity whatsoever with which I have been, am now or will be affiliated.