Big Data, Small Laptop
Working in R locally is great - until it isn’t. As datasets grow from a few hundred megabytes into the multi-gigabyte or even terabyte range, even the chunkiest workstation starts to smoke like an old diesel van. Memory errors, endless waits for a simple function call to return; the little donut in the RStudio environment tab turning from green through orange to red - we’ve all been there. Throw in more complex pipelines, iterative modelling, or high-dimensional data, and you quickly find yourself staring at a spinning beachball and wondering whether you ought to take up smoking too.
This is where Apache Spark earns its stripes. Spark is a distributed computing framework designed for large-scale data processing. It takes away much of the pain of parallelism, letting you write high-level code (including R code via sparklyr) that gets executed across multiple nodes, in memory, at speed. It’s open-source, well-maintained, and designed to scale from a single laptop to a multi-server cluster - and it can handle the kind of genuinely big data that would otherwise flatten your local R session.
Before you reach for Spark, though, it’s worth checking whether you really need it. If your data fits in memory on a single HPC node, tools like data.table in R can take advantage of multiple CPU-cores and are simpler and faster to set up. If you don’t need iterative processing, you can divide your computations into a set of independent jobs (e.g., processing one subset of the data per job) via a parallel job array. If these options don’t seem viable and you’d like to process your big data set with minimal parallel-programming headaches, then Spark is an excellent choice - assuming you can run it.
Deployment, Deployment, Deployment
Spark can be run in several ways - standalone, on YARN, inside Kubernetes, or via managed cloud services like Databricks. The official docs and tutorials are excellent if you want to spin it up on your laptop, in the cloud, or on a dedicated Spark service. But if you want to run it on a High-Performance Computing (HPC) cluster managed by SLURM…well, let’s just say that the internet’s collective wisdom gets a bit hazy.
HPCs have their own quirks - batch scheduling, shared login nodes, restrictive networking - that make “follow the quick-start guide” a non-starter. It’s not just about installing Spark; it’s about getting it to start across multiple compute nodes inside an allocation, with the driver and executors talking nicely to each other, and then giving you a sane way to connect to it from your local development environment.
The Remote Driver Dilemma
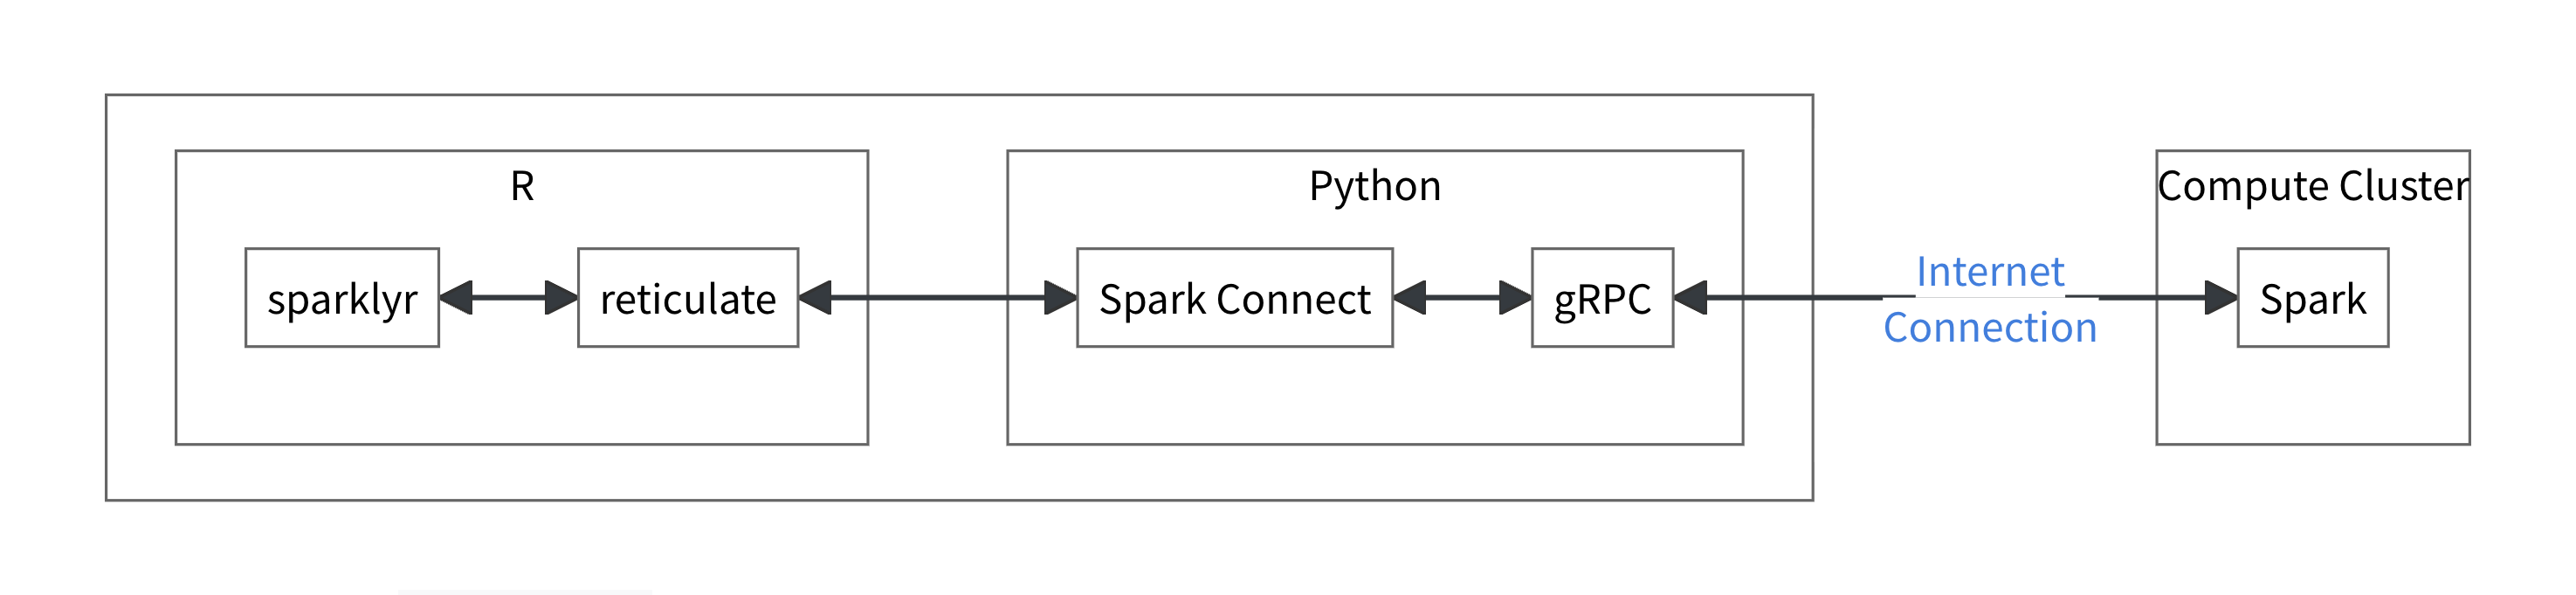
Traditionally, if you’d managed to spin-up a standalone Spark cluster on a HPC and wanted to use it from R, you had two main options. You could install Livy as a middle-layer REST server between your R session and Spark, or you could run RStudio Server on the cluster itself so that the Spark driver lived on the same network as the executors. Both work, but both come with their own issues: Livy adds complexity and a constrained API, reducing performance, while RStudio Server requires a full remote development setup and often system admin involvement to establish. Enter Spark Connect…
Introduced in Spark 3.4, Spark Connect is a decoupled client–server architecture that uses gRPC to let you connect to a remote Spark cluster from anywhere. This includes connecting from sparklyr inside your local RStudio session via reticulate, with some clever jiggery-pokery that leverages Python’s PySpark API. It separates the driver process (now running on the cluster) from your local R session, allowing you to develop in RStudio on your laptop, tunnel into the cluster over SSH, and work with Spark as if it were running right there - without having to lug the entire dataset across the network.
 Source: https://spark.posit.co/deployment/spark-connect.html
In the remainder of this post, I’ll walk you through a high-level overview of my solution to deploying a standalone Spark cluster on a HPC via SLURM, starting a Spark Connect server alongside it, and hooking it all up to sparklyr on your local machine using nothing more exotic than SSH port forwarding.
Battle Plans
Rather than pasting pages of BASh here and walking through it line-by-line, I’ve created a fully documented GitHub repository containing everything you need to get started: https://github.com/lquayle88/spark_on_hpc
The repo includes:
- The SLURM batch submission script
spark_cluster_launcher.shto request HPC resources and launch the Spark cluster - The helper script
spark-startto configure Spark, start the Master and workers, and run the Spark Connect server
Both scripts are commented if you’re interested in the detailed specifics of what’s going on under the hood; we’ll take a quick look at the SLURM batch script and describe the heavy lifting that spark-start does shortly.
When submitted via sbatch, the spark_cluster_launcher.sh script requests cluster resources, loads the Spark initialisation script spark-start, starts the cluster, sources the environment it sets up, and prints tunnel, web UI, and sparklyr connection details. It then keeps itself alive until you cancel the job, at which point it will close ports and clean up after itself. Very accommodating. An outline version is shown below:
#!/bin/bash

#SBATCH --job-name=spark-cluster
#SBATCH --nodes=3               # node count - change as needed
#SBATCH --ntasks-per-node=1     # keep as 1
#SBATCH --cpus-per-task=3       # cpus - change as needed
#SBATCH --mem=8G                # memory per node
#SBATCH --time=24:00:00         # wall-clock time

# start the standalone cluster
spark-start

# source environment set up by spark-start
source "${HOME}/.spark-local/${SLURM_JOB_ID}/spark/conf/spark-env.sh"

# print connection information
# [snipped here — see GitHub repo for full details]

# print SSH tunnel instructions
# [snipped here — see GitHub repo for full details]

# cleanup on exit
# [snipped here — see GitHub repo for full details]

trap cleanup SIGTERM SIGINT EXIT

# keep job alive for interactive session
sleep infinity
The spark-start script called by spark_cluster_launcher.sh is 218 lines (hence sparing you the step-by-step) and is where the magic really happens. When initialised it:
- Validates it’s running inside a SLURM allocation
- Creates node-local scratch directories and per-job config dirs in
~/.spark-local/$SLURM_JOB_ID/ - Starts the Spark Master, captures its URL, and broadcasts a worker-start script to all allocated nodes
- Adjusts the worker on the driver node to leave CPU/RAM for the driver itself
- Starts the Spark Connect server bound to
0.0.0.0on port15002so we can reach it via SSH
Once spark-start finishes running, you’ve got a working cluster with a Connect endpoint: this information is contained in the log file slurm-%j.out, where the %j is replaced with the job allocation number, which will be located in the directory from which the job was submitted (or specified with the --output scheduler flag).
When you check this file e.g., using less /path/to/slurm-%j.out you will see SSH tunnel instructions in the form shown below, where host, username, cluster and domain will be replaced with your HPC credentials: this is the command you will use in your local terminal to create the SSH tunnel and forward the Spark connection ports.
ssh -N \
  -L 15002:<spark_master_hostname>:15002 \
  -L 8080:<spark_master_hostname>:8080 \
  -L 4040:<spark_master_hostname>:4040 \
  username@cluster.domain
When you run the above, you will be prompted to authenticate and assuming that this is successful (i.e., that you don’t repeatedly mistype your password as I have a habit of doing), the terminal will appear to hang. Don’t panic - this is expected because the -N flag is used for forwarding ports and instructs the terminal that no remote command will be executed. Now you can open one of the following in your web browser:
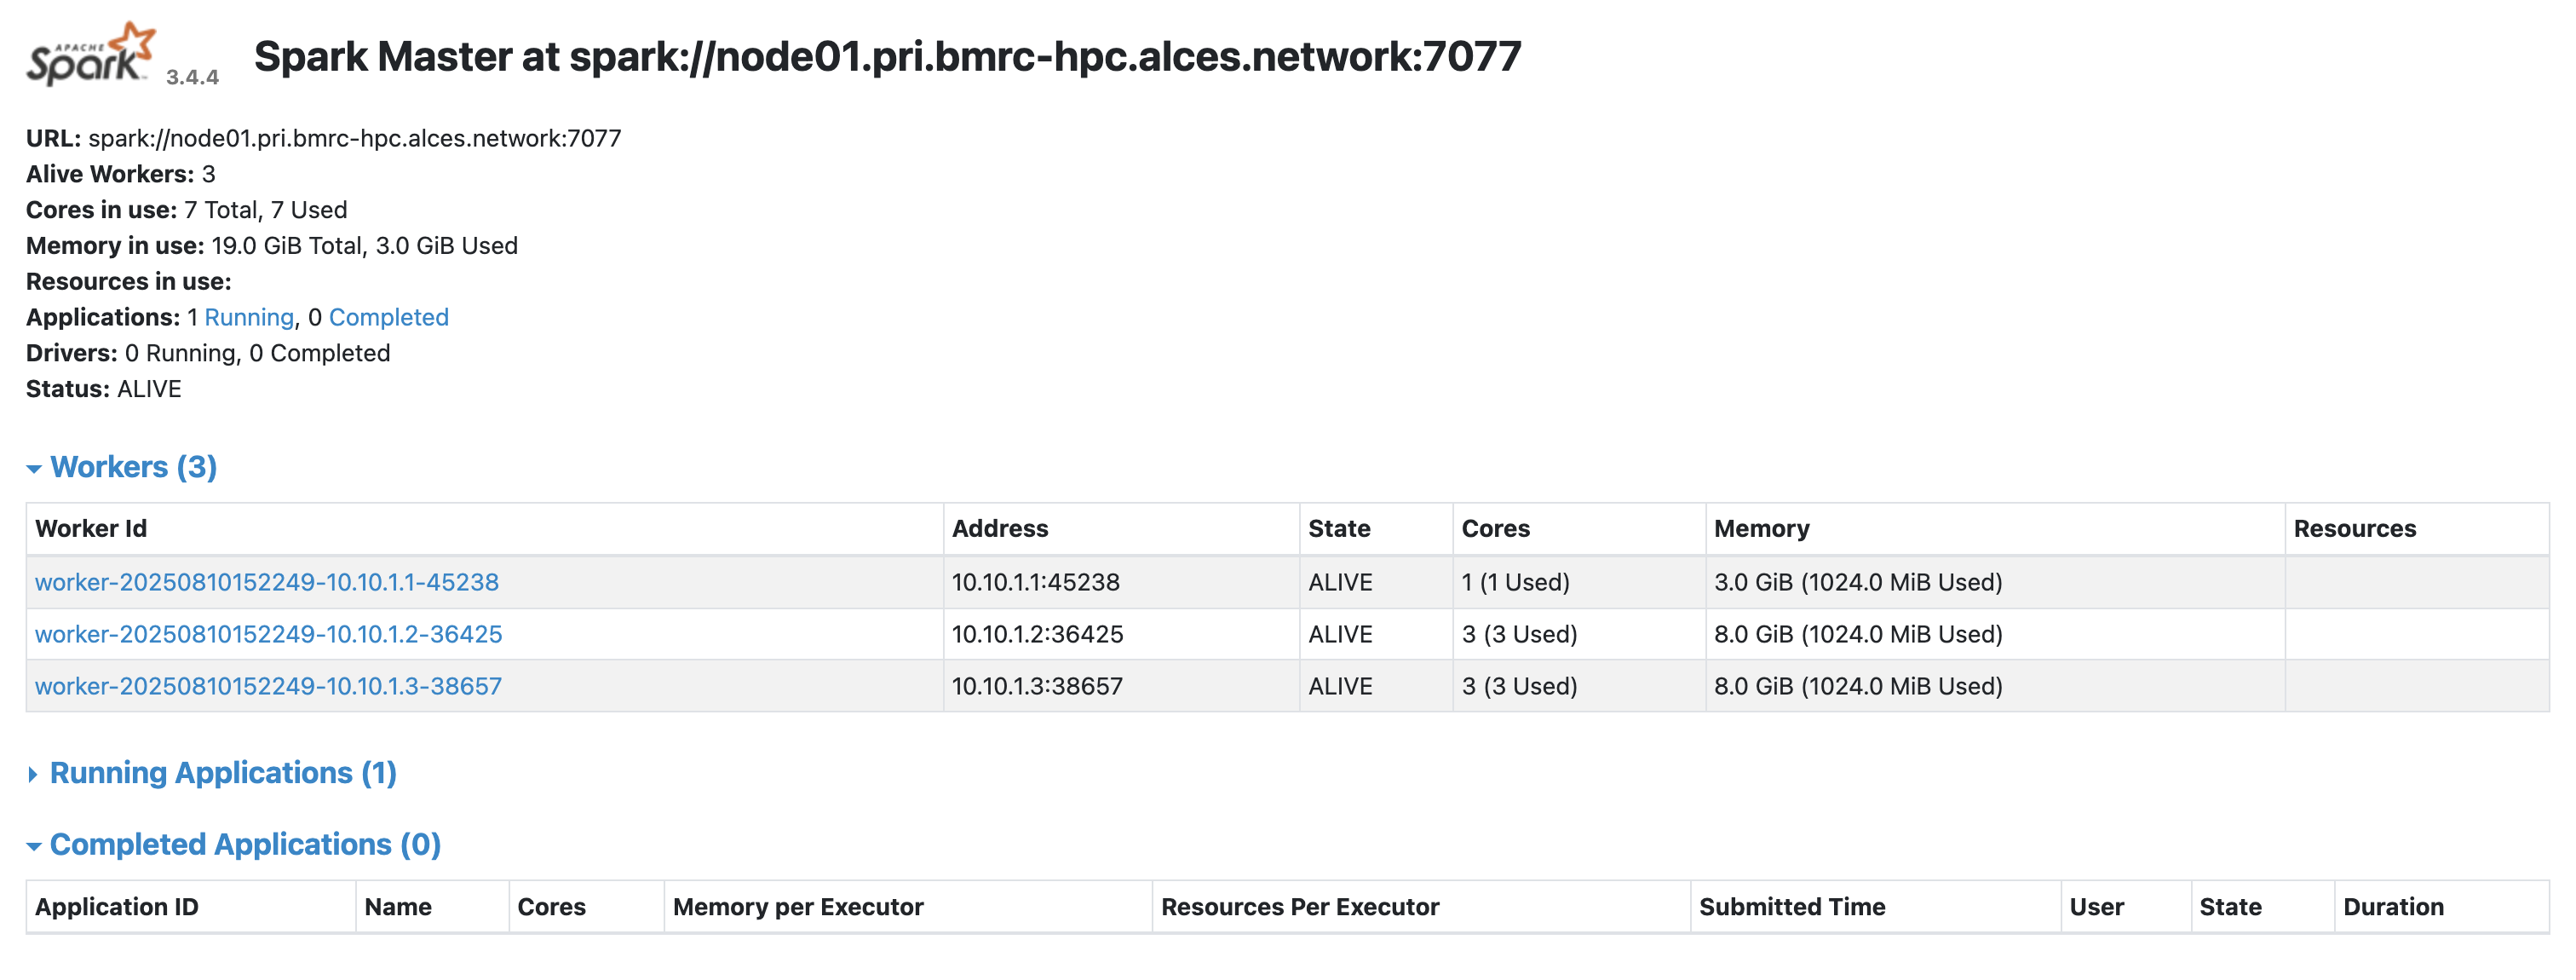
Master UI (cluster overview): http://localhost:8080
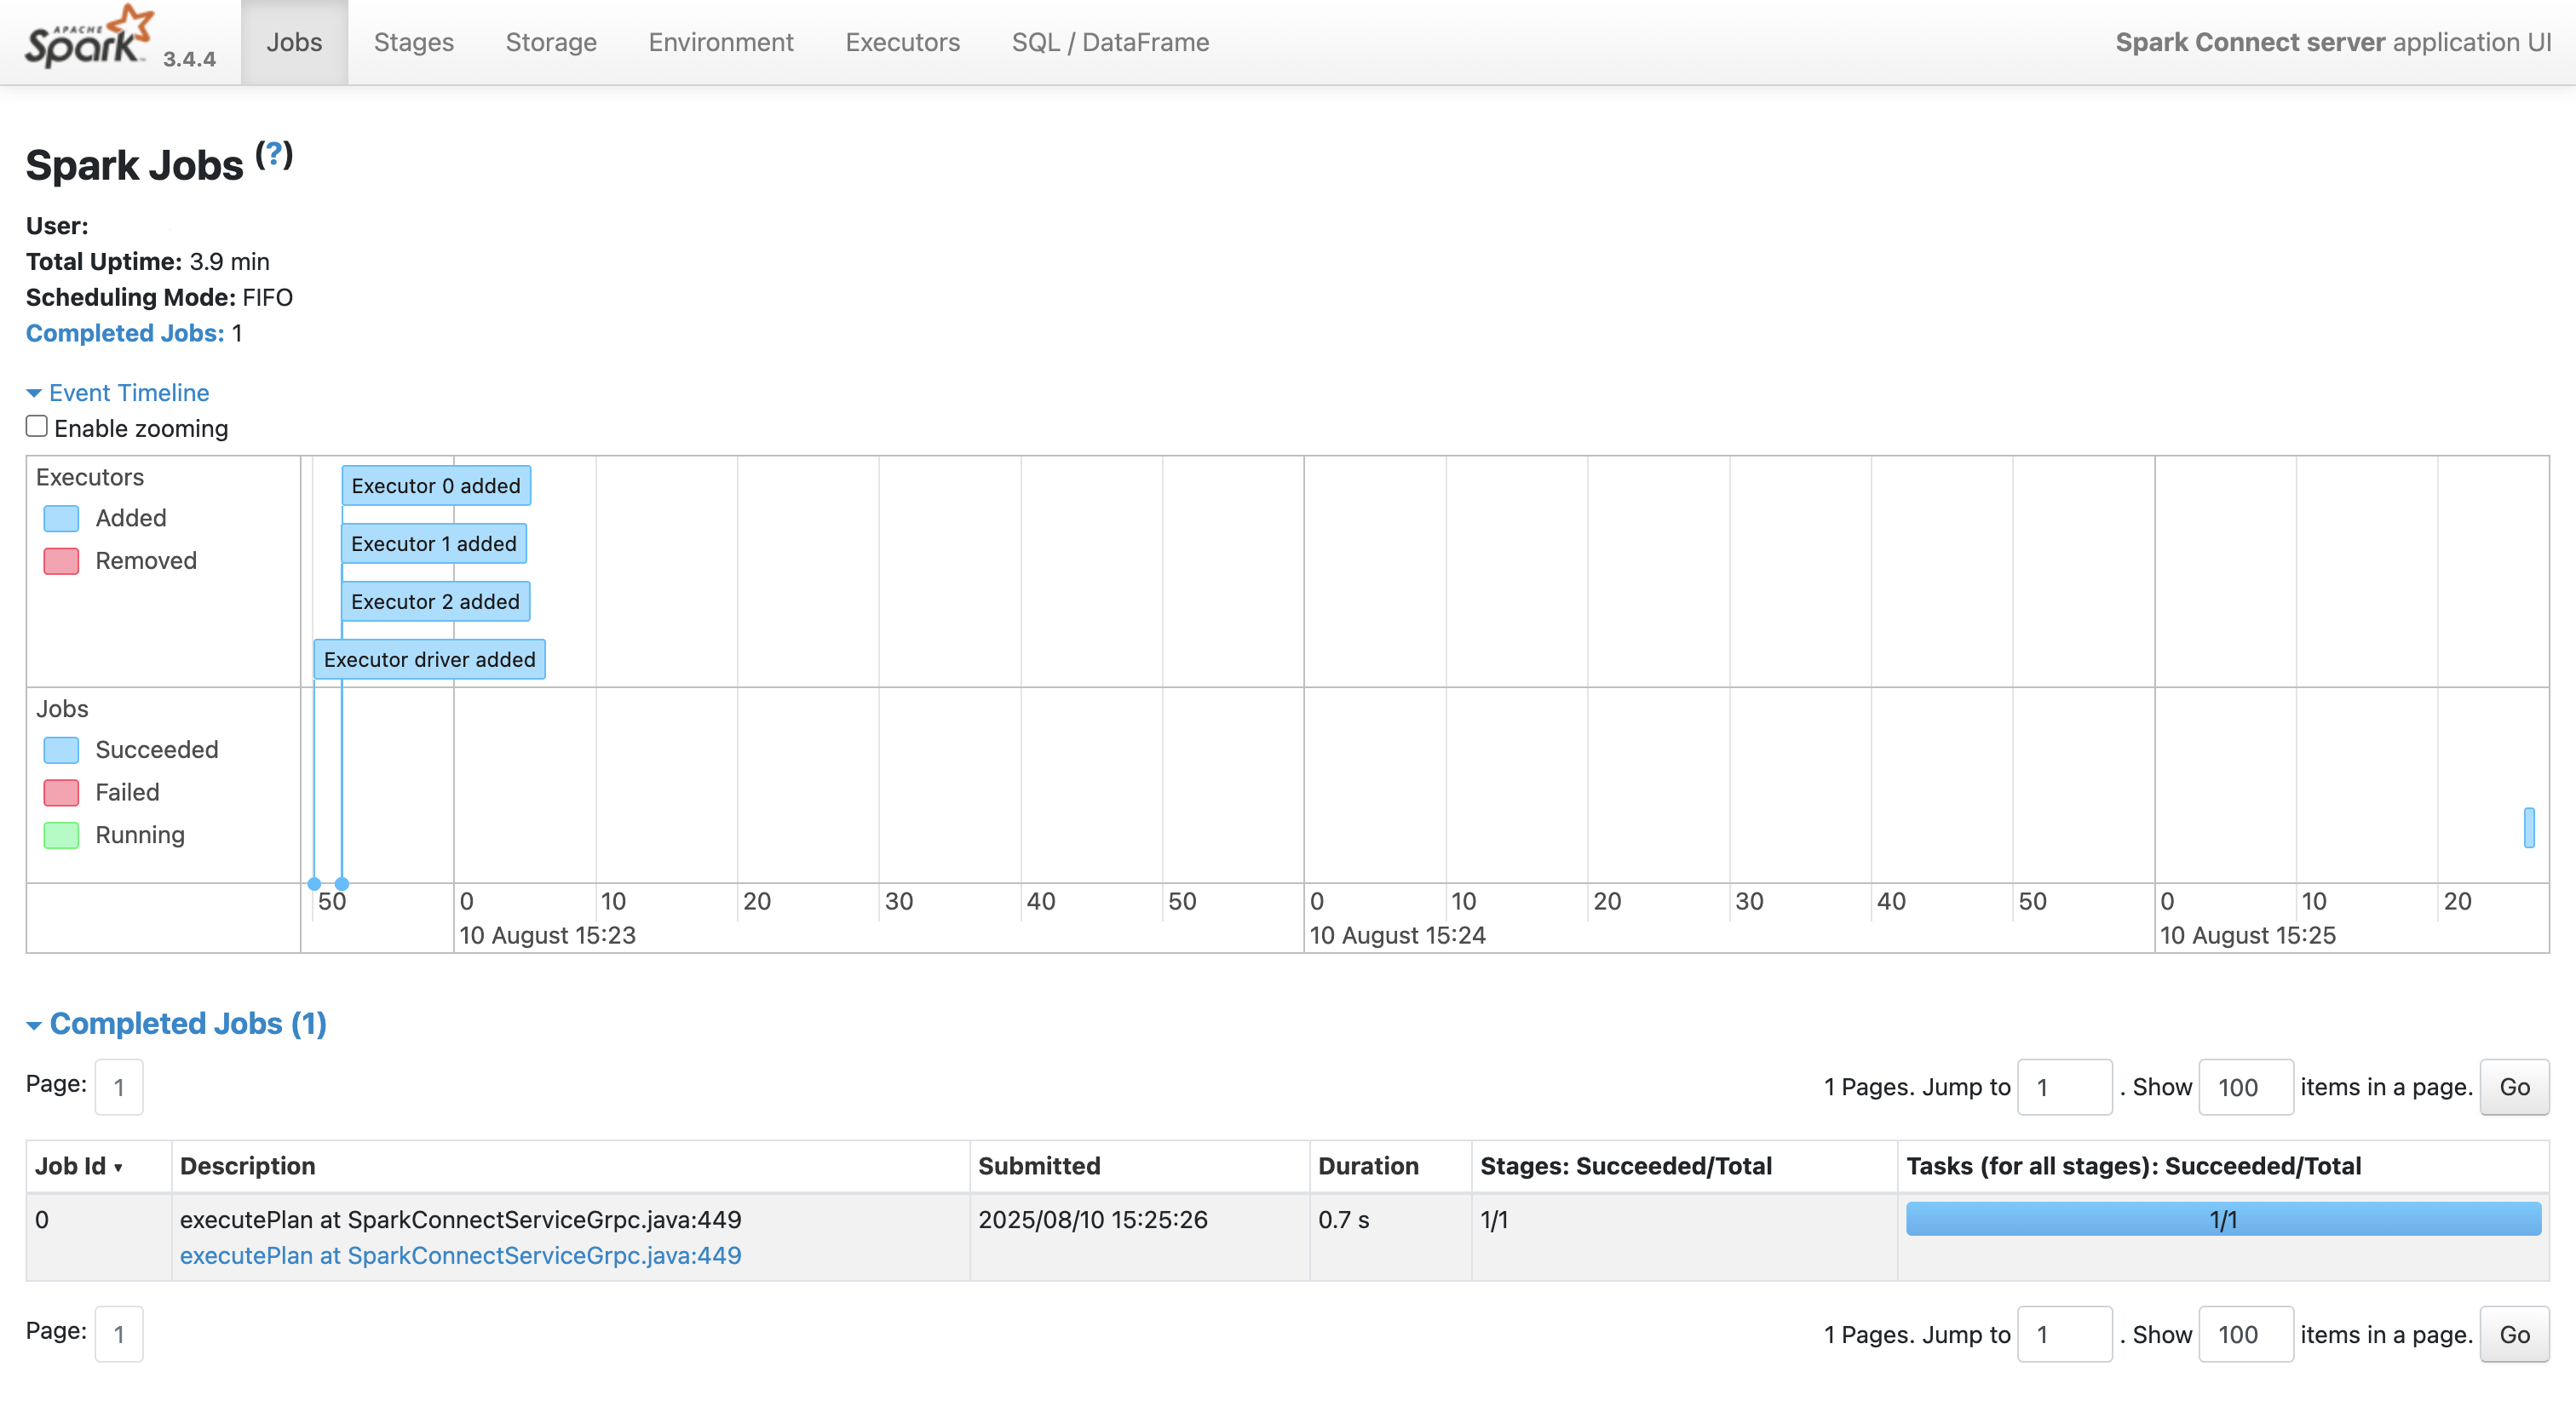
Application UI (multi-tab): http://localhost:4040
At this point, you’ve done the hard work - you’ve provisioned HPC resources with SLURM, launched a multi-node Spark cluster, and opened the doors for remote access. In other words: you’re now the proud owner of a fully functioning, SLURM-backed Spark environment. All that remains is to hook it up to R via sparklyr, so you can get straight to wrangling big data from the comfort of your local RStudio session. Let’s make that connection.
Connect to Spark with sparklyr
To access your Spark Cluster via Spark Connect, you will need the following two packages:
- sparklyr ≥ 1.8.4
- pysparklyr ≥ 0.1.3
install.packages("sparklyr")
install.packages("pysparklyr")
The sparklyr package needs some specific Python libraries to connect and interact with Spark Connect. Thankfully for most, Posit provide a convenience function that will automatically create a Python environment (either a venv or conda virtual environmnet) and install the requisite Python libraries.
Now, while you can use pysparklyr::install_pyspark() to install the latest versions of all the libraries, I don’t recommend that. The reason I don’t recommend that is because when you run the above, sparklyr will query PyPi.org to get the latest version of PySpark and install that version BUT it is strongly recommended that the version of the PySpark library matches the Spark version of your cluster. To do this, you can pass the Spark version explicitly via the version argument:
pysparklyr::install_pyspark(version = "3.4.4")
To start your Spark cluster session, you will need to create a connection using the spark_connect() function and set the master and method values. The connection URL should use the sc:// protocol, with the address set to localhost:15002, which corresponds to the local end of the SSH tunnel you created earlier. For the method use spark_connect.
# load dependencies
library(sparklyr)

# create spark connection
sc <-
  spark_connect(
    master = "sc://localhost:15002",
    method = "spark_connect",
    version = "3.4.4"
  )
I also recommend that you explicitly set the version of Spark in use too: if version is not passed, then sparklyr will automatically choose the installed Python environment with the highest PySpark version and let you know which environment it will use via a message in the console.
Spark connection configuration is outside the scope of the post, but I will briefly mention that, should you wish to do this, you will need to setup your config list object prior to creating the connection and pass this to spark_connect() as shown here:
# config example
config <- spark_config()
config$spark.executor.memory <- "4G"
config$spark.driver.memory <- "4G"
config$spark.executor.cores <- 2

sc <-
  spark_connect(
    master = "sc://localhost:15002",
    method = "spark_connect",
    version = "3.4.4",
    config = config
  )
The following links will be useful to those of you wanting to read into this in more detail:
At this point, you’re ready to rock and roll - the Spark cluster is chugging away on the HPC, you have a secure tunnel back to your laptop, and sparklyr is wired up to Spark Connect. From here on out, you can treat your connection just like any other sparklyr session, except that the horsepower under the hood comes from multiple HPC nodes instead of white-hot laptop CPUs and blackened RAM.
Disconnect and Cleanup
When your analysis is finished, you can end the session from R just as you would with any other sparklyr connection:
spark_disconnect(sc)
That severs the link between your local R session and the Spark Connect server on the cluster, but it doesn’t shut the cluster down. For that, you’ll need to cancel the SLURM job itself:
scancel <jobid>
It’s good HPC etiquette (and frankly, basic decency) to do this rather than letting the allocation sit there idling until the scheduler boots it for you. Wasted node-hours are everyone’s problem - they burn through shared resources, delay other users’ jobs, waste energy (contributing to global warming) and make HPC admins cranky. If I catch you doing this on my cluster, you’ll be banished to the pits (or receive a passive-aggressively worded email).
Thanks to a bit of final wizardry in the batch script, once scancel is run the cleanup() function will gracefully stop the Connect server, Master, and workers, and free up all ports ready for next time.
Summary()
And there you have it - a fully functioning Spark cluster running on a HPC cluster, talking to your local RStudio via Spark Connect, without Livy or RStudio Server in sight. You get the comfort of your familiar R workflow, the muscle of a multi-node cluster, and the satisfaction of having wrestled SLURM into doing exactly what you want. Now go forth and crunch something truly enormous - just remember to scancel when you’re done 😉
Thanks for reading. I hope you enjoyed the article and that it helps you to get a job done more quickly or inspires you to further your data science journey. Please do let me know if there’s anything you want me to cover in future posts.
If this tutorial has helped you, consider supporting the blog on Ko-fi!
Happy Data Analysis!
Disclaimer: All views expressed on this site are exclusively my own and do not represent the opinions of any entity whatsoever with which I have been, am now or will be affiliated.